Chapter 6 Workflows: Connecting the parts
Training a model is a multi-step process. It requires:
- defining the model
- training and validating the model
- deploying the model
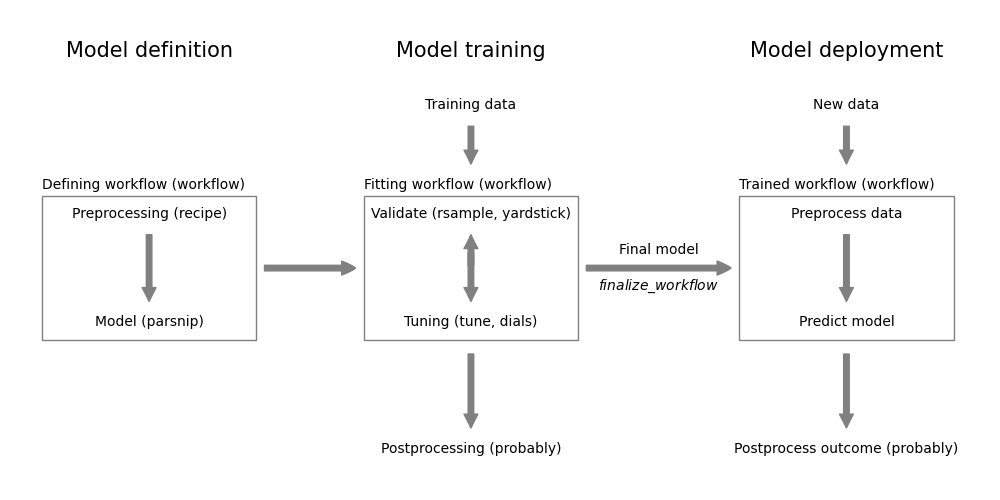
Figure 6.1 summarizes the modeling workflow and shows how the individual steps are implemented in the tidymodels framework.

Figure 6.1: Modeling workflow
The left column covers the model definition part. A complete model defintion requires:
- Preprocessing (
recipepackage - see Chapter 7) - Model specification (
parsnippackage - see Chapters 8 and 10) - Postprocessing (
probably- see Section 11.1.2)
The workflow package from tidymodels, allows to combine the first two steps into a single workflow object. The workflow object can then be used to train and validate the model. Only the preprocessing and model specification can be included in the workflow at the moment. While the postprocessing step should be part of the full model process, the workflow package doesn’t support it. For now, the postprocessing step has to be done separately. For example, we will see in Section 11.1.2 how the probably package can be used to define a threshold for binary classification models. In this class, we will only use postprocessing for classification models.
The workflow package is also able to orchestrate the model tuning and validation. It involves:
- Model tuning (
tunepackage - see Chapter 14) - Model validation (
rsample,yardstickpackages - see Chapter 12, 13) - Tune postprocessing (
probablypackage - see Section 14)
The objective of model tuning is to find the best model parameters. This can include the model hyperparameters (e.g. the number of trees in a random forest) and the preprocessing parameters (e.g. the number of principal components in a PCA). The tune package allows to define potential values and combinations of these parameters. This combined with the validation strategy defined using the rsample package, allows tune to examine the performance of different models and select the “best” one. The performance is measured using the various metrics provided by the yardstick package.
At the end of the model training step, we end up with a final trained workflow for deployment. For now, this means
- predict new data using the final model by:
- preprocessing the new data using the (tuned) preprocessing steps
- predicting with the (tuned) model
- if applicable, postprocessing the predictions (e.g. applying a threshold for the predicted class probabilities)
6.1 Example
The following chapters covers the components of workflows in more detail. This can make it difficult to see the big picture. You can find complete workflows in the examples part.
6.2 Models vs. workflows
It may initially be confusing to have a second way to build models. However, there is consistency between using both. As can be seen from the following table, the two approaches are similar and only differ in the way the models and the formula are specified.| Model | Workflow | |
|---|---|---|
| Specification |
model <- linear_reg() |
rec_definition <- recipe() %>%
    add_formula(formula)
wf <- workflow() %>%
    add_model(linear_reg()) %>%
    add_recipe(rec_definition)
|
| Validation |
result_cv <- model %>%
    fit_resamples(formula, resamples)
|
result_cv <- wf %>%
    fit_resamples(resamples)
|
| Model fit |
fitted_model <- model %>%
    fit(formula, trainData)
|
fitted_model <- wf %>%
    fit(trainData)
|
| Prediction |
pred <- fitted_model %>%
    predict(new_data=newdata)
|
pred <- fitted_model %>%
    predict(new_data=newdata)
|
| Augmenting a dataset |
aug_data <- fitted_model %>%
    augment(new_data=newdata)
|
aug_data <- fitted_model %>%
    augment(new_data=newdata)
|
As we will see in Chapter 7 and 14, workflows are required to incorprate preprocessing into the model building process and to tune model parameters. It is therefore best, to use workflows and use simple models only when absolutely necessary.
Further information:
- Take the short datacamp course at https://app.datacamp.com/learn/courses/modeling-with-tidymodels-in-r
- Go to https://workflows.tidymodels.org/ to learn more about the
workflowspackage - The workflowsets package allows to combine multiple workflows into a single object. This is useful when you want to compare multiple preprocessing steps and/or multiple models at the same time. We will not cover this package in this class.